Getting started with Spring authoring
Use an LLM as your design partner and the analyser as the window you share. Agree what the application should do, inspect its Spring XML, then compare actual results with your expectations. The LLM edits and runs the project through its own tools; the analyser displays design and evidence.
Guided means a conversation following the project's runbooks. It is optional, with no special runtime mode or separate “guided” project type. You can follow the same steps yourself.
Use starter 1.0.73 or later
New Fluxtion Spring XML downloads include the fixed public Maven descriptor. The shipped
setup.sh, validation, changed-design generation and sample run have been verified with
starter 1.0.73. Setup and XML validation need no compilation key; generation still needs
the backend prerequisites below.
If you already downloaded a 1.0.72 project, update starterVersion in
fluxtion-authoring.json to 1.0.73, and update the POM's fluxtion.bom.version from
1.0.72 to 1.0.73. Keep your source and ownership entries. Run ./setup.sh again.
Choose your starting point
| You want to… | Start here |
|---|---|
| Learn the analyser without building anything | Guided analyser tour, using its included demo log. |
| Run an existing example and examine its evidence without a compilation key | Playground to analyser, using the Audit analyser bundle. |
| Design and change an application in Spring XML | This guide, using Fluxtion Spring XML. |
| Host a Spring design in Mongoose | Use Fluxtion Spring in Mongoose and its hosting/build runbooks. It currently omits the local authoring record and scripts, so the setup/validate/generate steps below apply to the standalone template only. |
For the Spring path, use JDK 21, network access for provisioning, and analyser 1.16.0 or later. Your local LLM needs access to the downloaded project and a terminal. Generation through RapidAPI also needs a configured, subscribed compilation key; an installed local generator is a different route. XML validation itself is keyless.
1. Download a project
In the analyser, choose File ▸ New project from template… (or Author a new project on the start page). Choose Fluxtion Spring XML, read its prerequisites, and download into an empty directory. A shipped profile opens automatically. The analyser does not build it for you.
Alternatively, open the website starter, choose the template through Templates, and leave Analyser support enabled. To download directly:
curl --fail --location \
  'https://fluxtion-playground.dev/start/scaffold?template=fluxtion-spring&artifact=spring-first-project&group=com.acme&basePackage=com.acme.springdemo' \
  --output spring-first-project.zip
unzip -l spring-first-project.zip
unzip spring-first-project.zip
cd spring-first-project
The website and local LLM can acquire the project before an analyser is running. There is no need to run a local playground or docs server. Analyser support is on by default, including older shared configurations; an explicit opt-out removes its profile/integration files.
Read PROJECT.md, then RUNBOOK.md. Check that these files exist:
| File | Purpose |
|---|---|
src/main/fluxtion/designer/application-context.xml |
The declared graph. |
src/main/java/ |
Node behaviour, event types and application code. |
fluxtion-authoring.json |
Pinned starter version and source ownership history; keep it in version control. |
PROJECT.md, RUNBOOK.md, runbooks/ |
The project's entry point and task instructions. |
.analyser/project.fluxtion-settings |
Source roots, processor declarations and runbook pointers. |
The sample names a market-data node, volatility and sentiment calculations, a risk engine and an order gate. These are starter scaffolding, not implemented trading rules. Agree and test the behaviour before treating a class name as a capability.
2. Open the shared canvas and connect your LLM
Start the released analyser. If you downloaded outside the analyser, choose
File ▸ Open project… and select .analyser/project.fluxtion-settings directly.
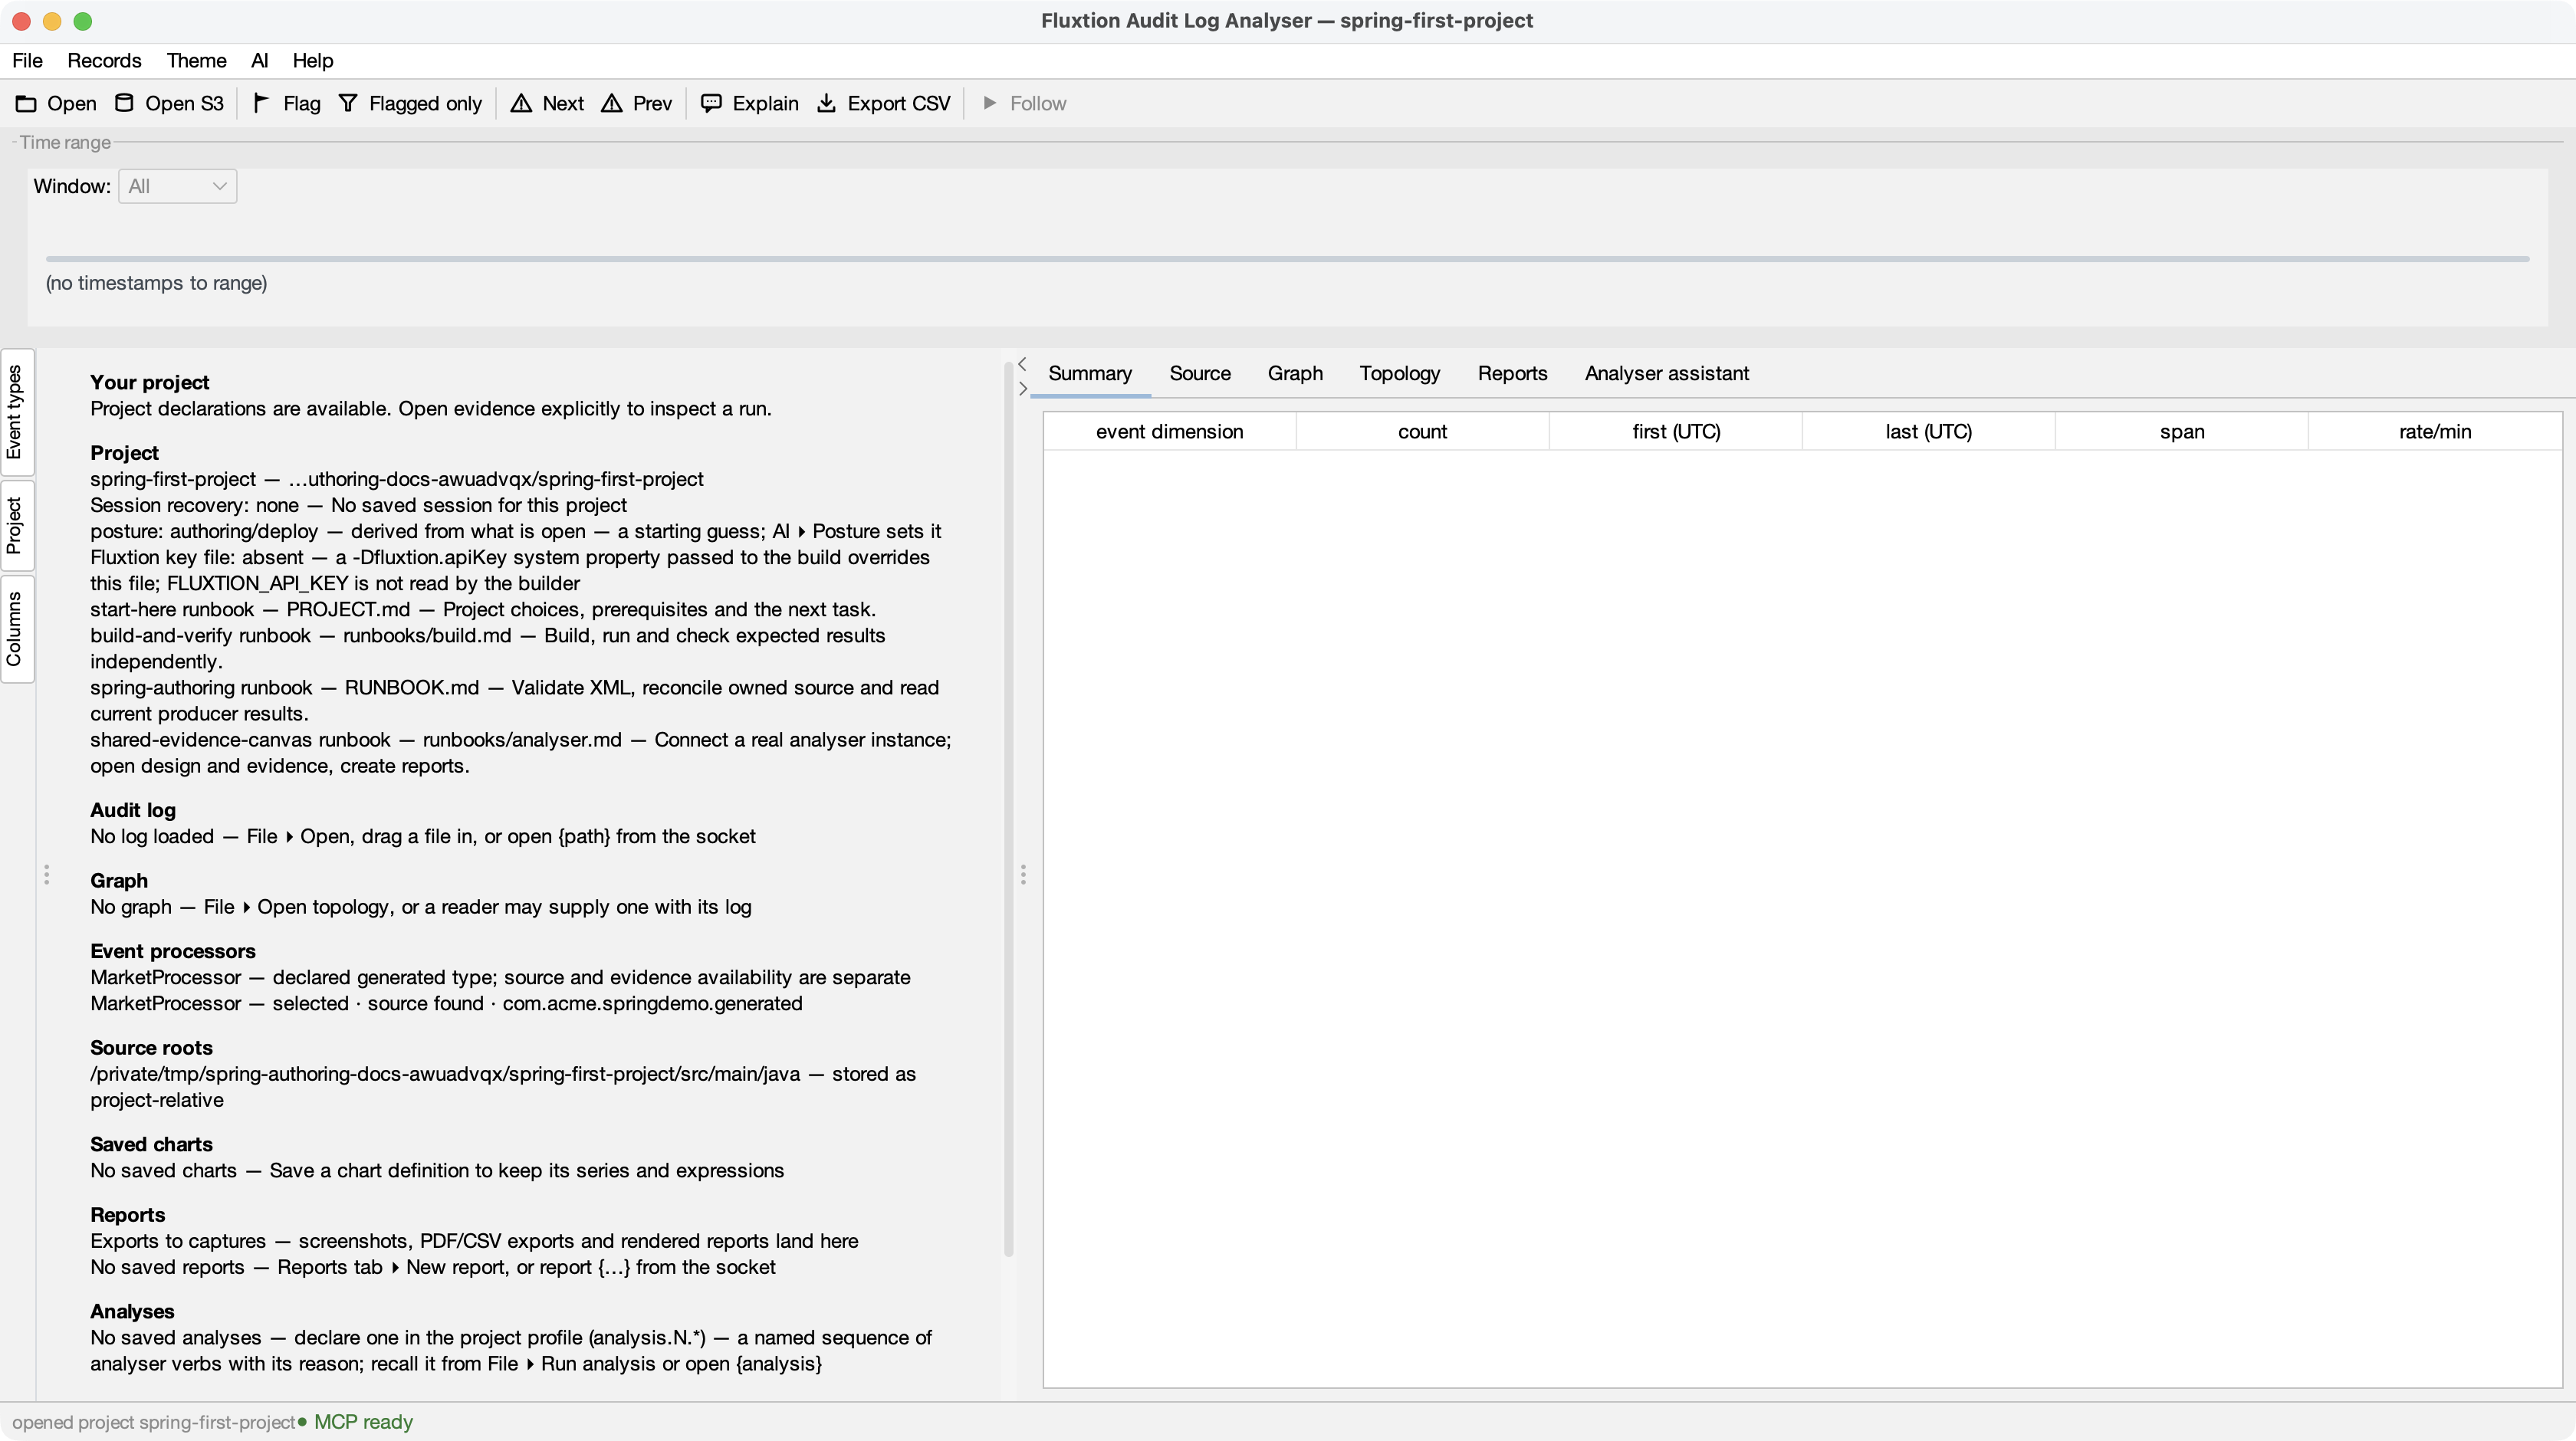
Checkpoint: the project name and runbooks appear, while the page honestly says No log loaded and No graph. A declared processor and a source shell are not proof of a successful build.
Open your LLM client in the same project directory. In the analyser, use
AI ▸ Connect an AI client… and follow the instructions for that client.
See Connecting an LLM. The download does not contain a machine-specific MCP
endpoint: configure the actual running analyser, then have the client call analyser_context.
Paste this prompt once the client can access the project and analyser:
Give me a guided first session with this Spring authoring project.
Read PROJECT.md, RUNBOOK.md, fluxtion-authoring.json and the declared runbooks.
Call analyser_context and confirm which project and files the window is showing.

Start by showing the XML design and explaining the nodes and dependency directions.
Ask what behaviour I want before editing anything. Agree one small input sequence
and expected outputs with me before writing the implementation.

Use the project's tools for validation, generation and execution. Check prerequisites
first; stop at provisioning or key failures and show the actual error. Keep the
download's dependency coordinates. The analyser is our canvas, not our build runner.

After each stage, tell me what to look at in the analyser and verify its context.
Keep XML validity, a successful build, and observed application behaviour separate.
End with one question answered from actual evidence and the next step written down.
3. Inspect the design before running it
In File ▸ Settings… ▸ Source roots, keep the existing Java root and add the project's
src/main/fluxtion/designer directory. Add target once it exists to authorise producer reports.
Opening a project alone does not authorise every file beneath it.
Choose File ▸ Open design…, select application-context.xml, then select riskEngine
in the Source tab's bean index. A connected LLM can make the same selection with
analyser_source {"bean":"riskEngine"} after opening the design.
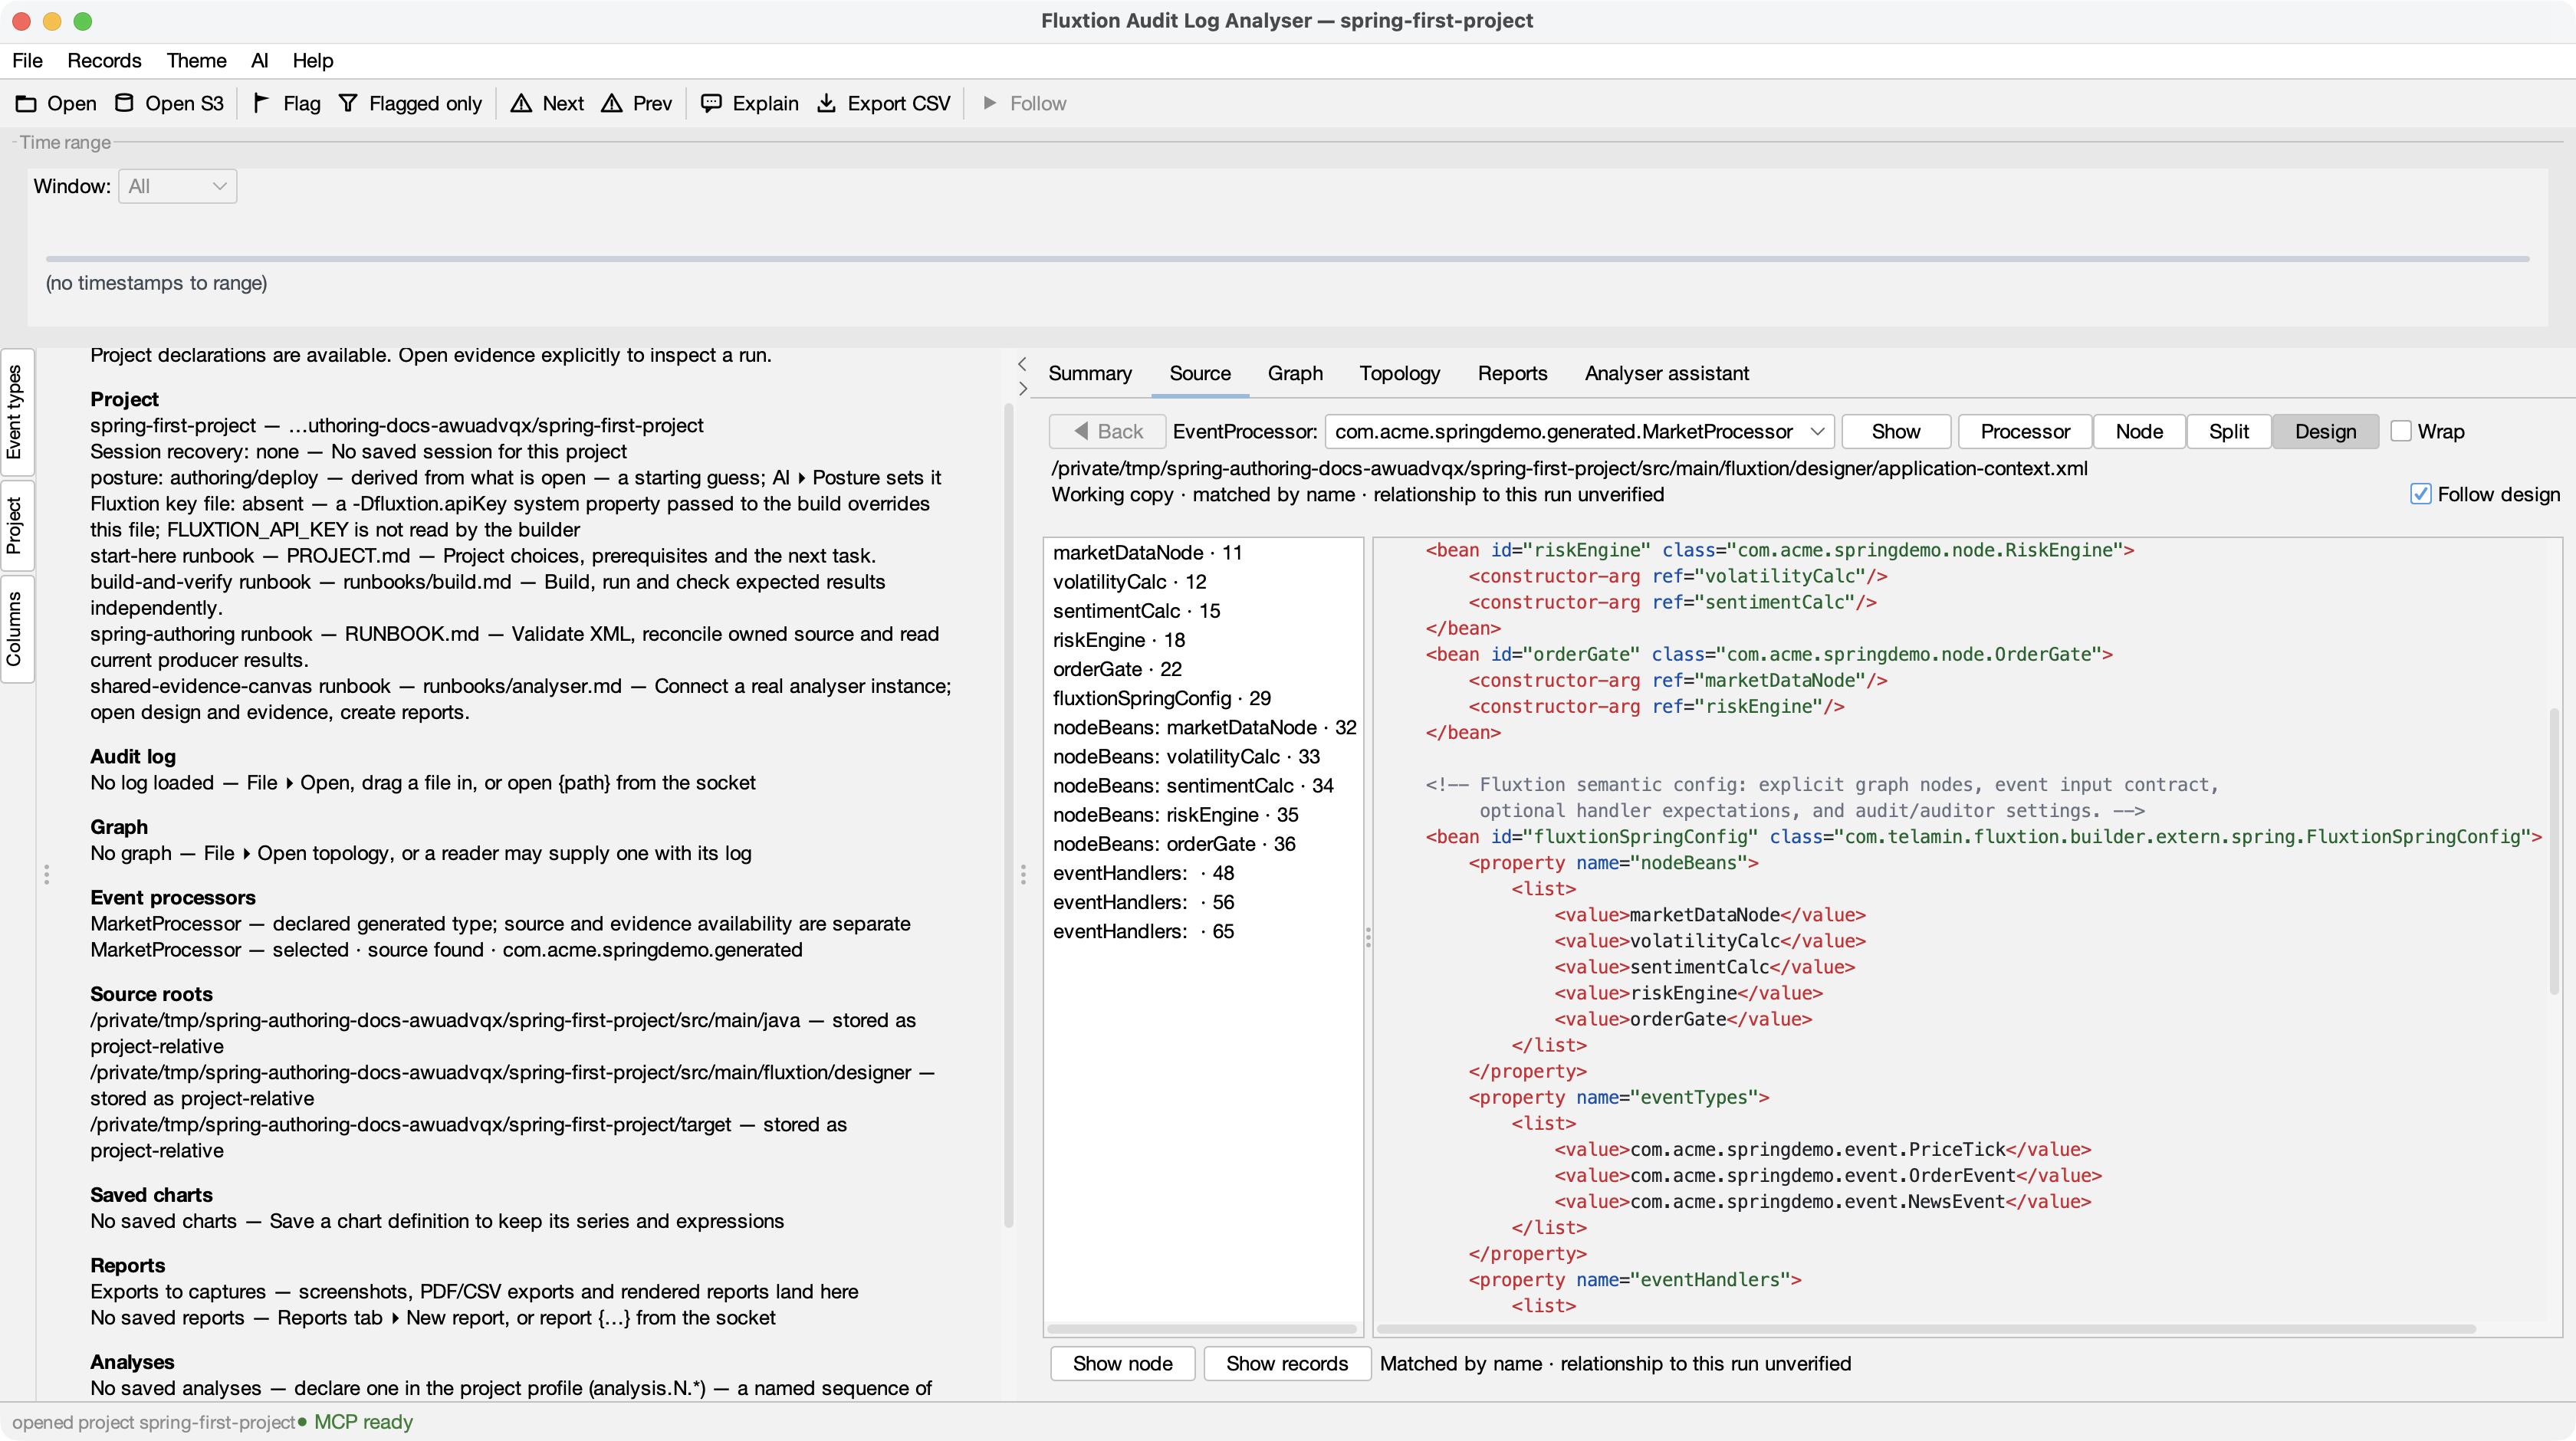
Checkpoint: you can read the declaration before any compilation or run. Follow design refreshes it after edits. “Relationship to this run unverified” is not an error: the working XML has not been proven to describe a loaded execution.
Ask the LLM: “What feeds this node? Which references should trigger it, and which should only
supply data?” The capability guide explains
DATA, TRIGGER, events, services and lifecycle declarations.
Never list a supplier's class in nodeBeans
Reference it from one of your own nodes instead. The starter writes skeleton classes for
nodeBeans entries it cannot find source for. A class that exists only in a dependency jar
looks like a class that does not exist yet, and the skeleton silently replaces it: the build
stays green and the supplier's component is gone. This remains open as
the dependency-shadowing issue.
See the vendor worked example before adding a supplier jar.
The website also previews imported XML as a graph. This separate two-node example shows its
declaration view; its arrow points from child to its dependency rootNode:
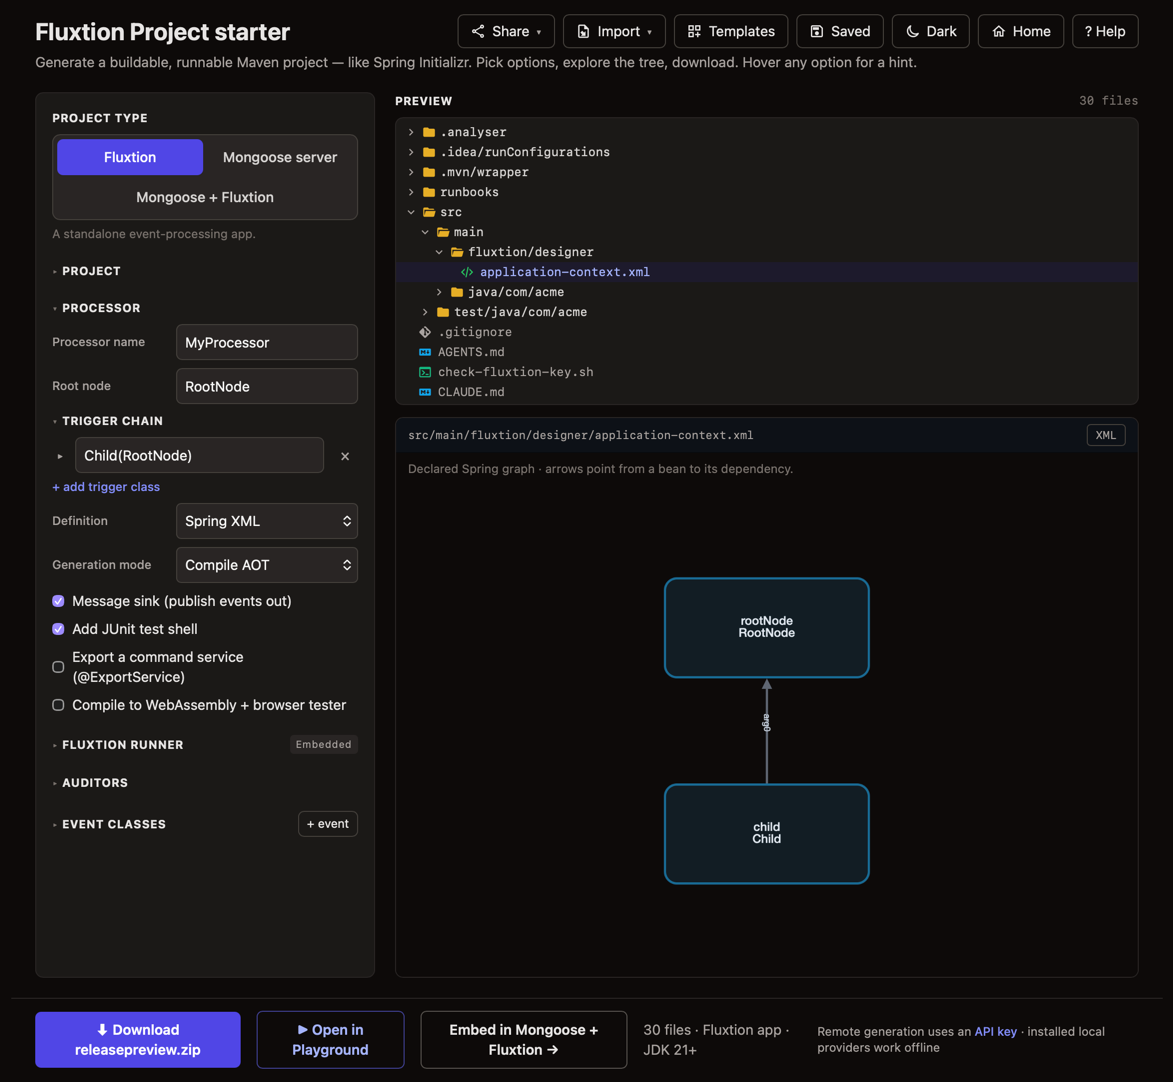
This is not the runtime graph for the five-node sample above. Use generated GraphML and a matching audit log when investigating execution.
4. Validate and read a real finding
Run the shipped project commands:
setup.sh fetches the pinned tool and resolves the classpath. Stop if it fails; do not treat
an incomplete setup as successful validation. Validation checks XML declarations without loading
your node classes. It writes target/fluxtion-validation.json.
In the analyser, choose File ▸ Open producer diagnostics… and open that JSON file. The result appears under Reports ▸ Producer findings.
For a small learning exercise, save the original XML, change only the orderGate value inside
nodeBeans to missingNode, and validate. The command should fail. Open its new result:
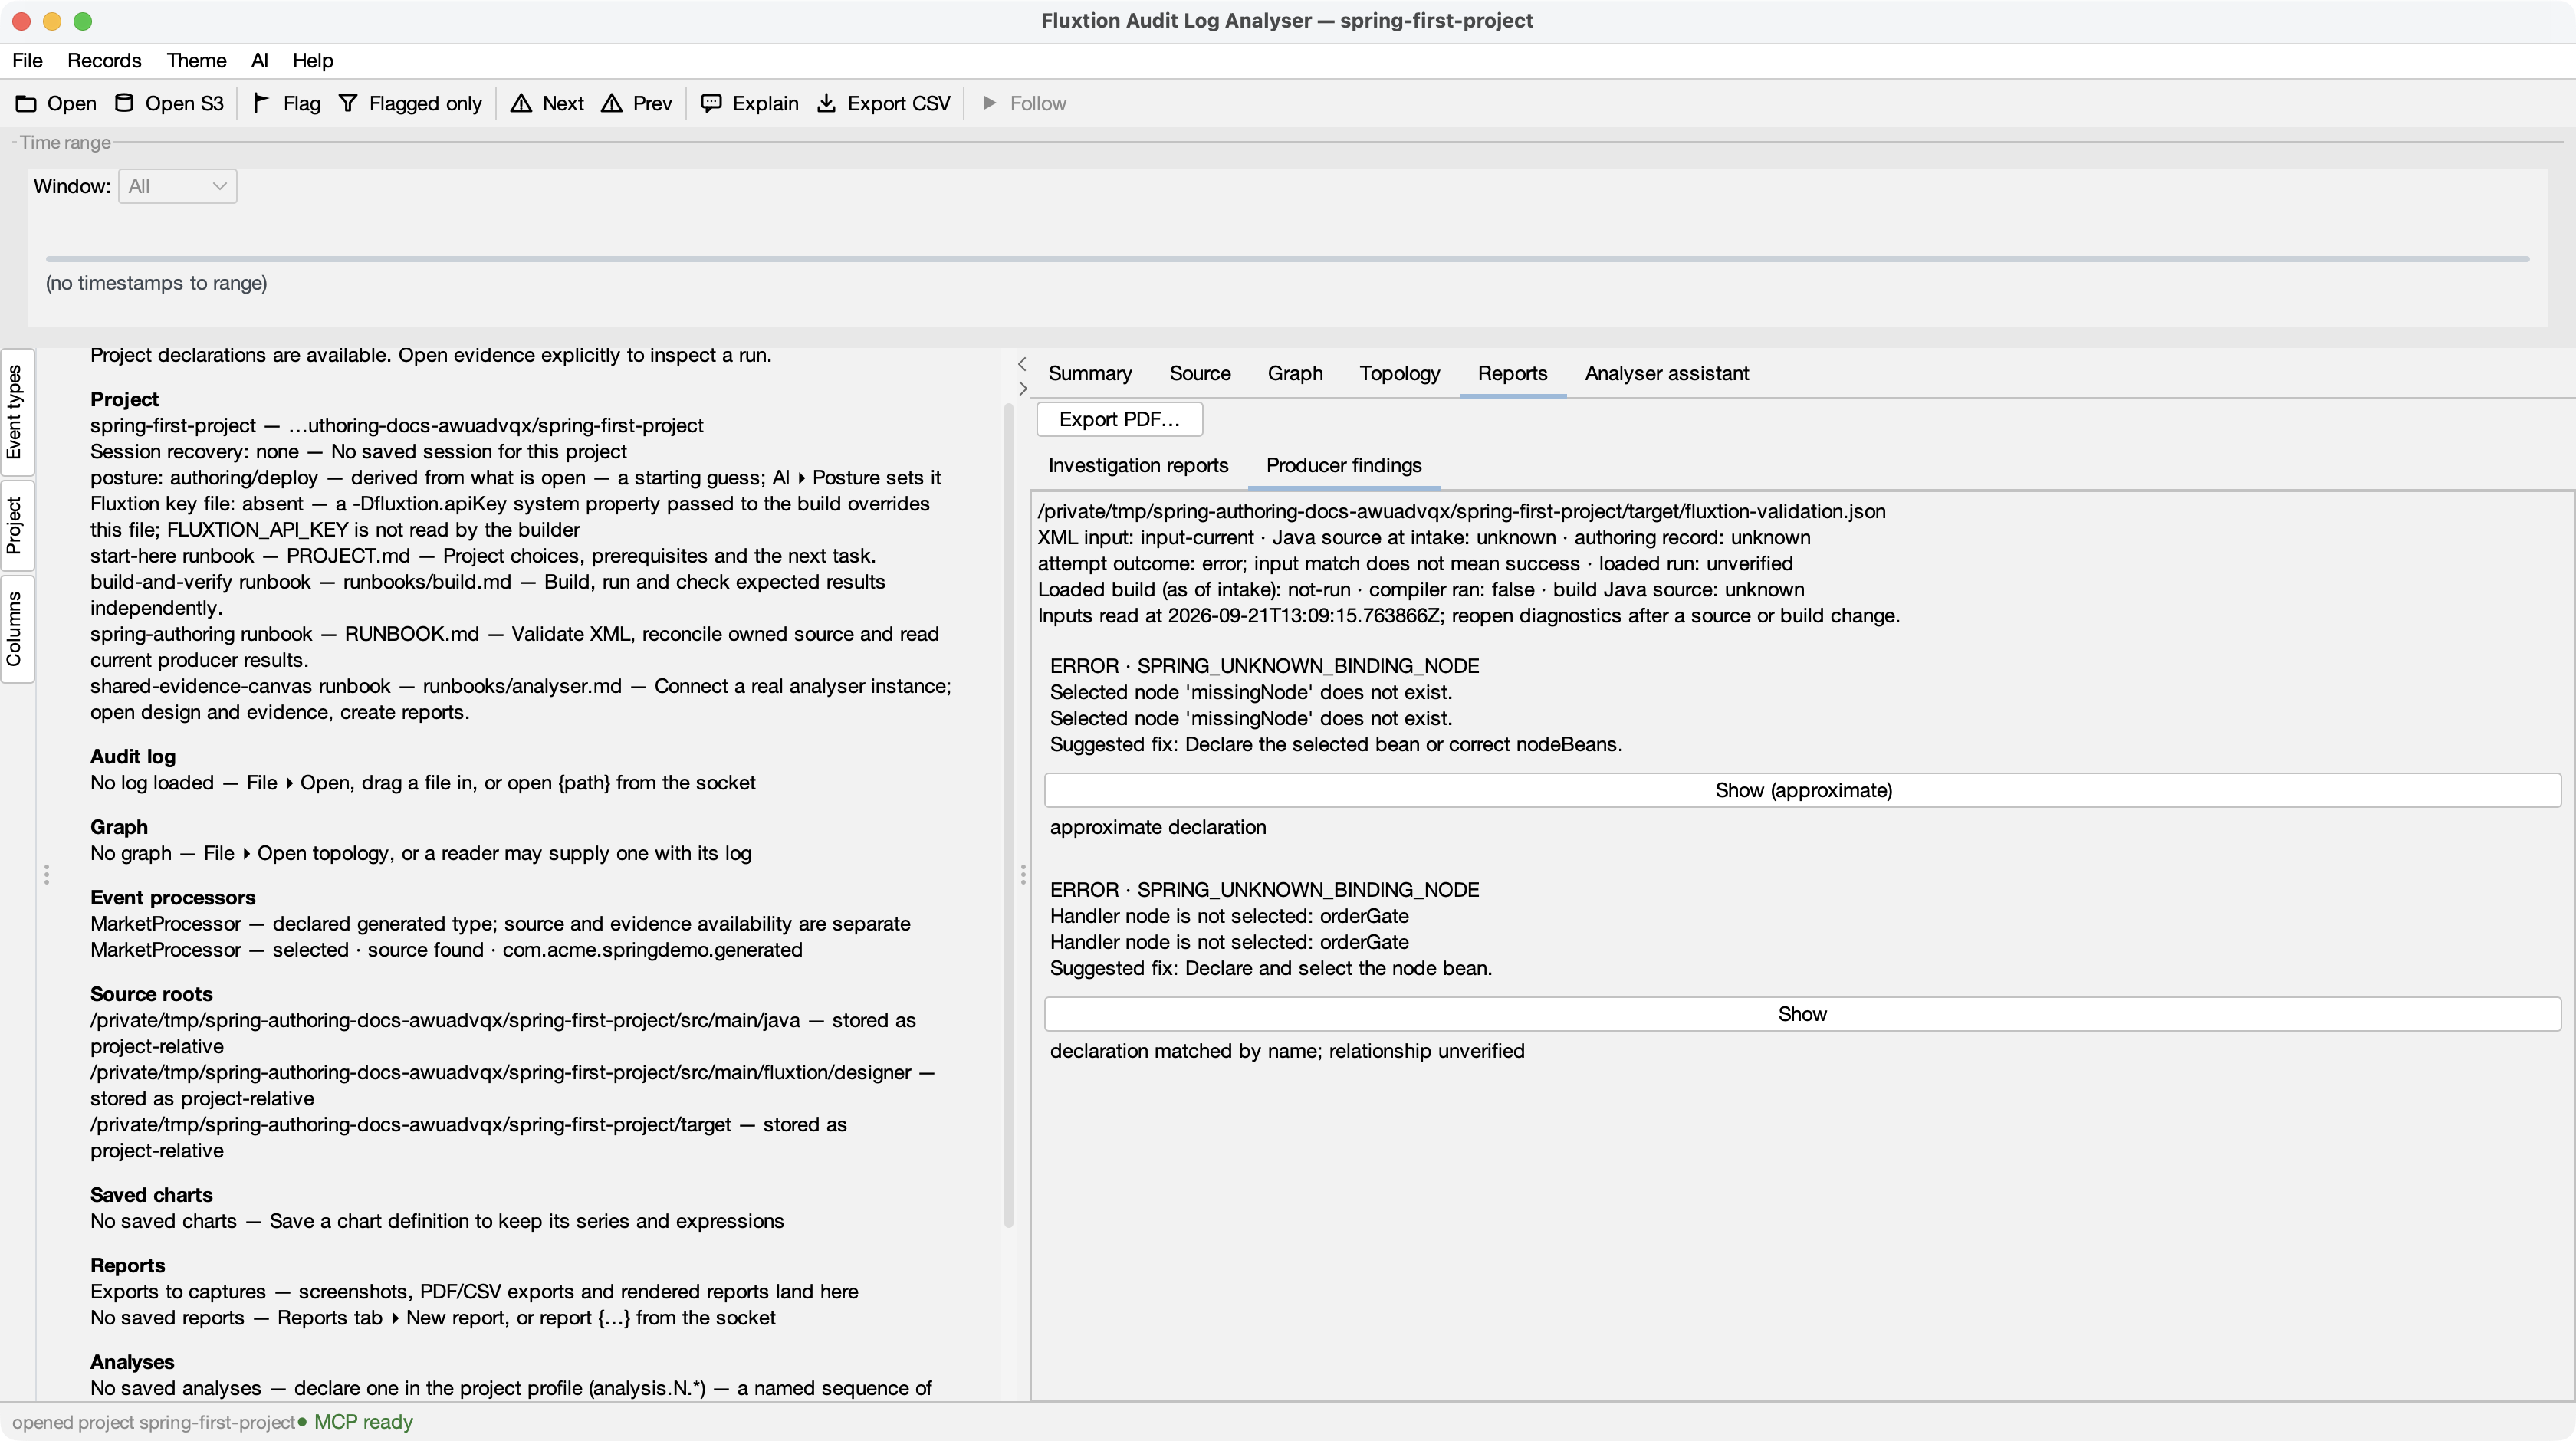
Checkpoint: the analyser shows the missing declaration and a suggested correction. It also says that matching XML is not a successful build. Show navigates to the reported location; approximate locations are labelled.
Restore orderGate, validate again, and reopen the result:
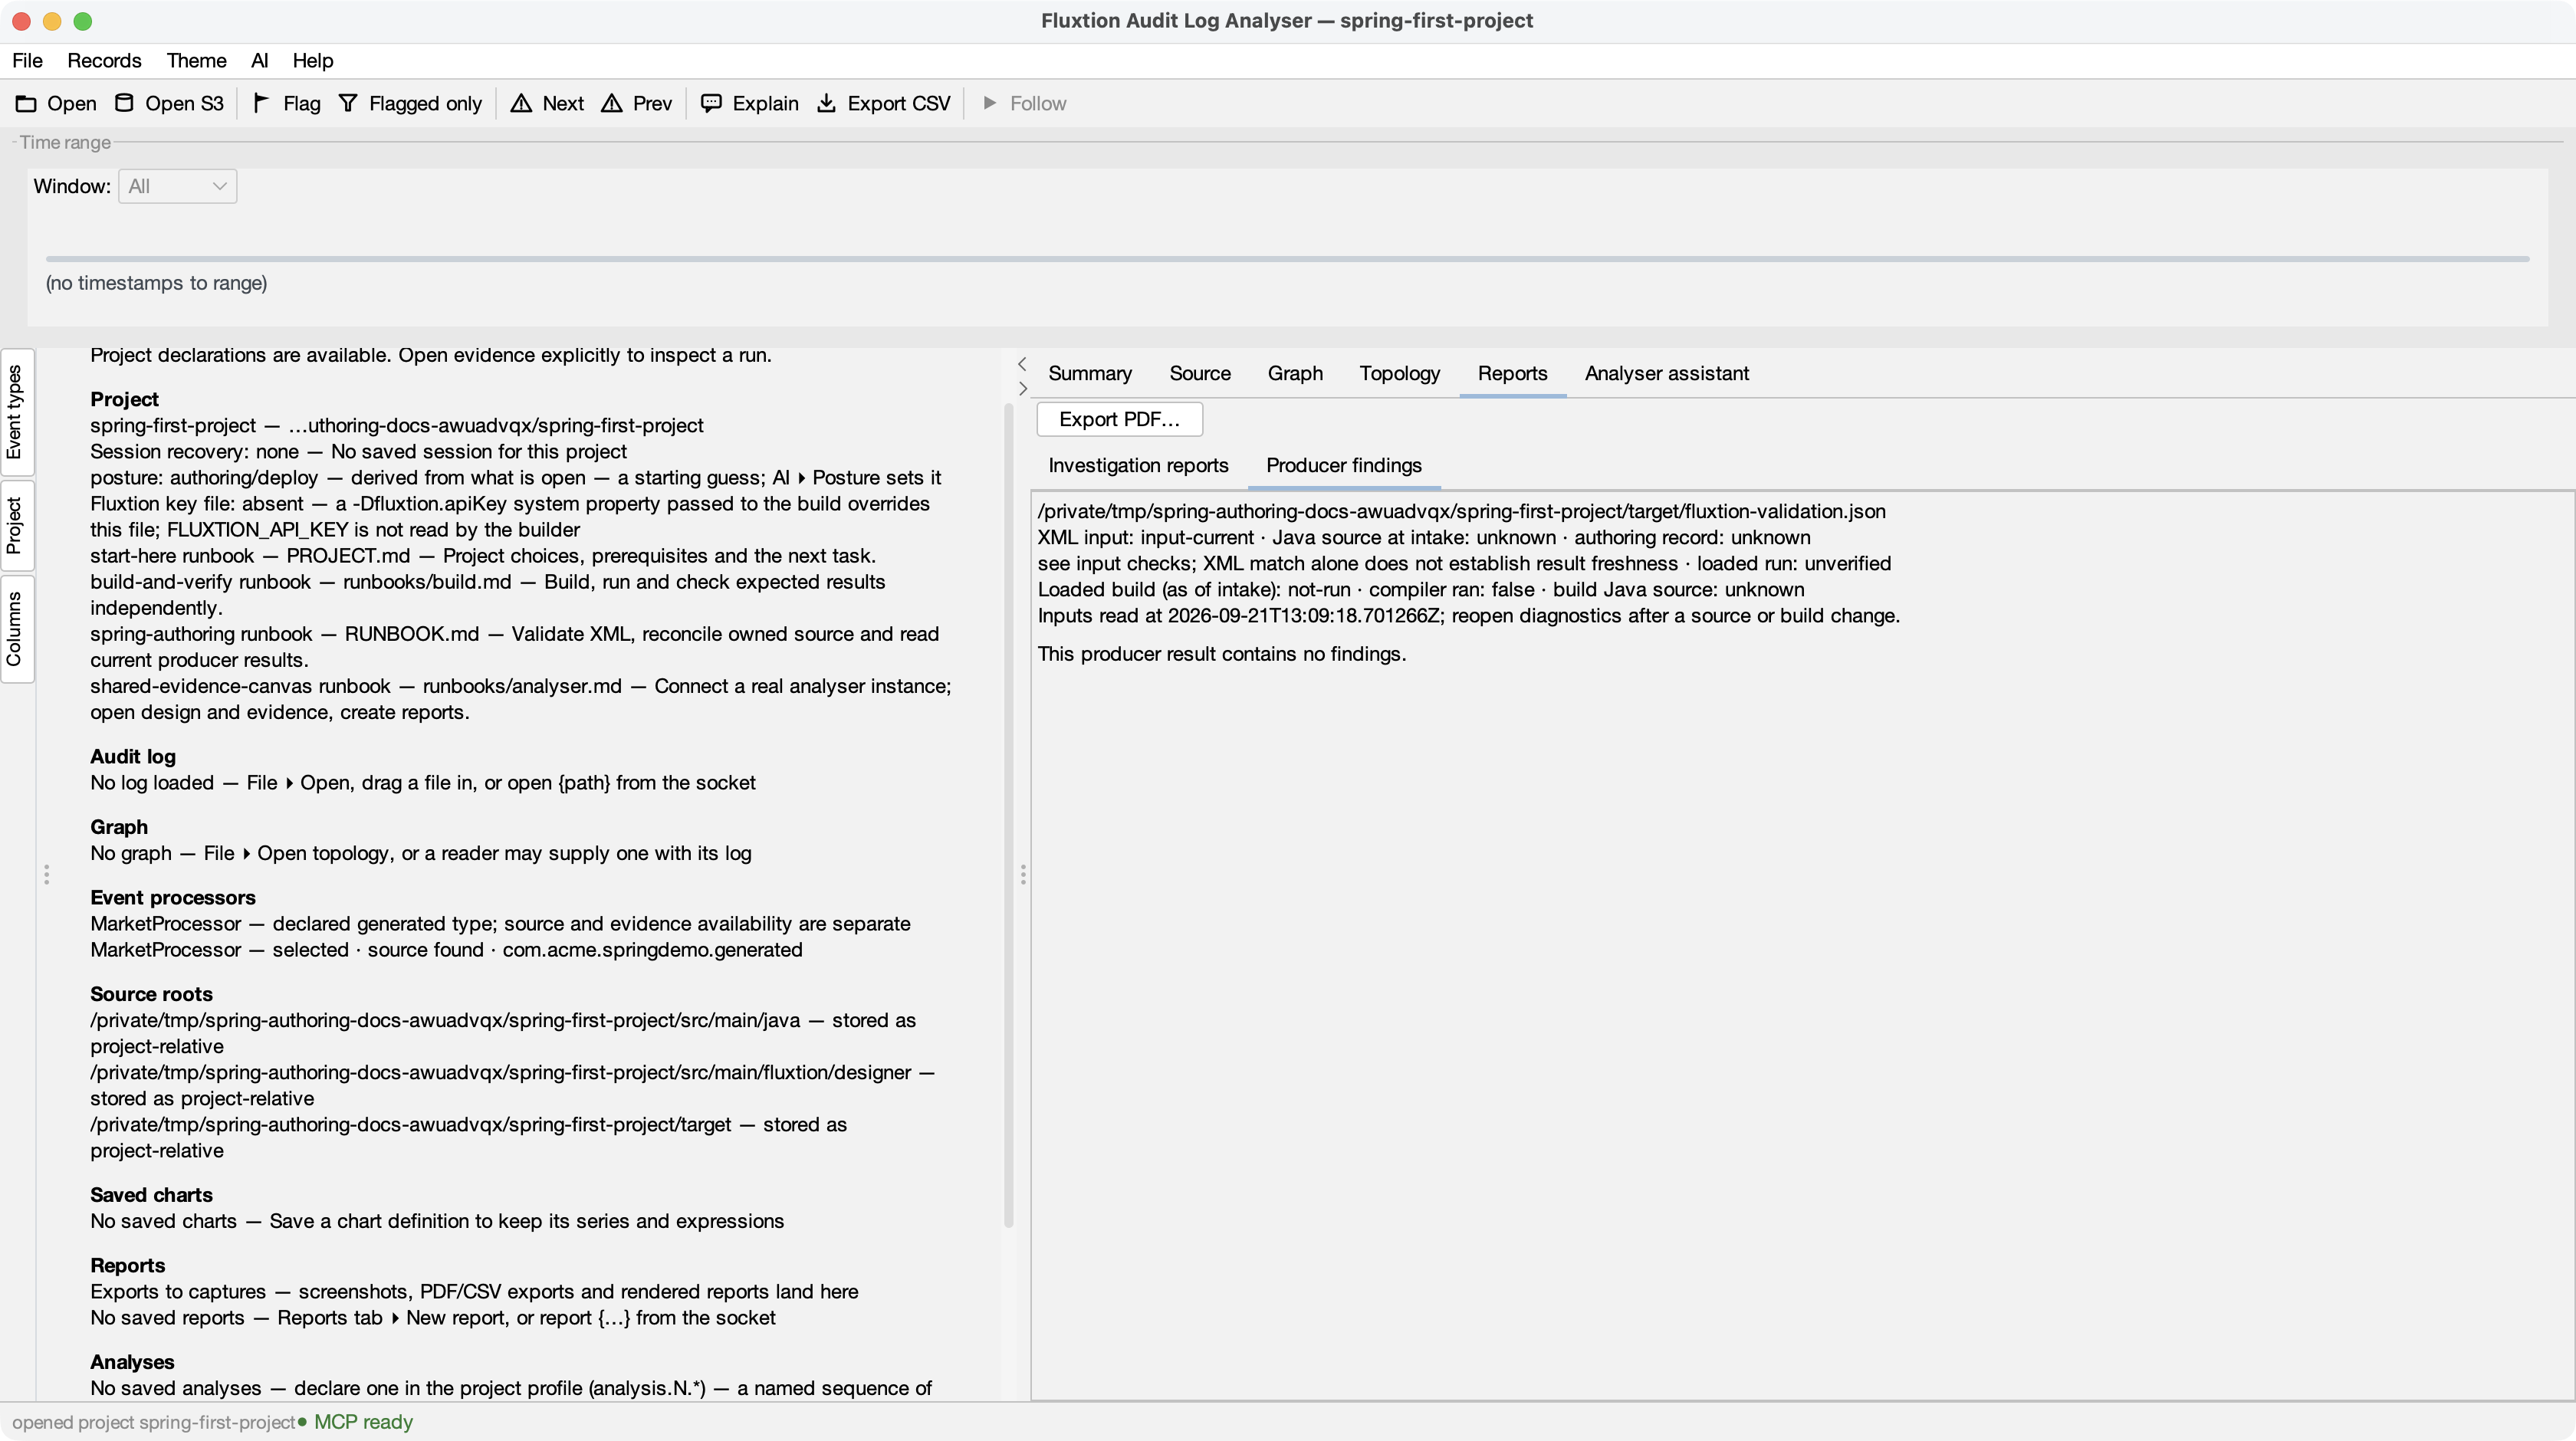
“No findings” here means this XML validation produced none. It does not prove Java compilation or correct business calculations. Reopen diagnostics after each producer run; do not rely on an older displayed result.
5. Implement, generate and run after setup succeeds
Continue only after provisioning works and the project's generation route is available. Have the
LLM implement the agreed behaviour in the node classes, with assertions for your expected outputs.
Then follow RUNBOOK.md:
Reconciliation plans source changes first, preserves implemented bodies where ownership permits, and refuses conflicts. Read the refusal rather than deleting ownership records to get past it.
New-node stubs still need audit scaffolding
Starter 1.0.73 makes stub generation reachable on the standalone template, but generated
stubs for new nodes do not extend EventLogNode. Their bodies cannot use its auditLog
field until you add that support. For a new node that must write audit values, manually make
it extend com.telamin.fluxtion.runtime.audit.EventLogNode, then implement the logging and
check the emitted record. Do not assume a generated stub already logs. This is the known,
still-open new-node audit-scaffolding gap.
In the reviewed new-node case on starter 1.0.73, reconciliation preserved the manually added
EventLogNode superclass and audit-writing body, including after a later handler declaration was
added. That checks edit preservation; check the emitted audit value after running your application.
The build receipt is target/fluxtion-run.json; compilation diagnostics belong to the latest
attempt only when that receipt says the compiler ran and its input checks still hold.
The default remote route requires a compilation key. Configure it using the project's preflight instructions or AI ▸ Fluxtion API key…, never by committing it. An installed local provider can be keyless; a custom HTTP host is not automatically a local provider.
The screenshots show download, design rendering and XML validation. The separate
1.0.73 release check
verifies the standalone setup, changed-design generation and sample run. The hosted-template
authoring gap (SG-2) remains open. For a Mongoose template, use
its emitted run-server.sh and host runbook; do not substitute the standalone run.sh commands.
6. Answer one question from evidence
Once you have an actual successful run, open its audit log and generated GraphML in the analyser. Use the project runbook to locate them; an expected filename is not evidence the file exists. An XML preview, generated topology and runtime audit each answer a different question.
For the scenario we agreed, compare expected and observed outputs independently.
Show the relevant audit cycles, topology and source in the analyser. Plot only
values that actually exist in the log. Point at the evidence before explaining it.
Create a report that separates observations, interpretation and untested cases.
The LLM can drive the same window you inspect. Challenge its answer by opening the selected records and source. An unlogged node is not proof of non-execution, and unchanged existing outputs alone do not prove a newly added calculation is correct.
Come back tomorrow
Keep XML, source, fluxtion-authoring.json and project runbooks in version control. Preserve
the logs and outputs needed to reproduce your conclusions. On project reopen or analyser relaunch,
choose Restore last session explicitly; changed or missing inputs may be withheld.
A restored canvas does not restore an LLM conversation. Start the new client in the project,
ask it to reread PROJECT.md and current results, then call analyser_context before continuing.
For examples of the conversation, see Design and “what if?” questions.
If open {design: ...} refuses an existing file outside the configured source roots, the refusal
includes the exact source_root {"add": ["..."]} call for its real parent directory. Review that
directory before granting access, then retry the design open; the refusal itself changes no roots.